Product Description
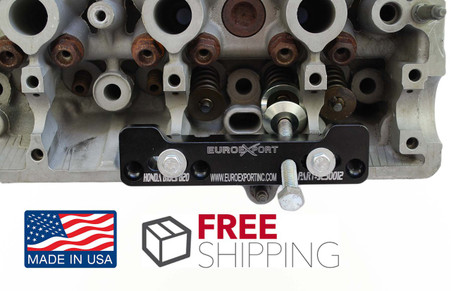
Removing valve springs has never been easier. This item replaces valve springs without having to remove the engine or cylinder head. With the help of this valve spring compressor tool, it only takes a matter of seconds to remove or install the valves spring assembly in your vehicle. Simply align the holes on the aluminum body of the valve spring compressor with the ones on the head using the dowel pin for proper alignment, bolt it using the provided short bolts, place the retainer cap on the retainers, screw down the long bolt into the body, remove the keepers using the magnetized screwdriver, and voila! it's done. Our valve spring compressor was specifically designed for non VTEC B18 and B20 heads and thus will fit flawlessly without any modifications.
-CNC machined 6061 anodized aluminum
-Can be used with the head on the block
-Will not slip and scratch or damage your head like universal clamp type valve spring compressors
-No need to remove the rocker arm shafts
-Included is a small magnetized screw driver to very easily remove or install the keeper
-Made in the United States
Application: Honda/Acura B18A LS, B18B LS, and B20 LS motor: Non VTEC B18 and B20 heads
We at Euroexport have been making our valve spring compressors for Honda for almost a decade. They are machined, anodized, and laser engraved in the United States.
Kit includes:
- Billet valve spring compressor body tool in anodized black (to prevent corrosion)
- Magnetic screw driver
- Main bolt
- Retainer cap
- Bolts
- Instructions
- Lubricant
Tips/Instructions for use:
If using with the head on the block, cylinders need to be pressurized to 100PSI to prevent the valve from falling into the cylinder. If using with the head out of the engine compartment, put something bellow the valve to keep it pressed upward.
- Place the dowel pins with the thinner end in the block and the wider end facing up. Align the holes on the tool with the dowel pins, and place the shorter bolts and washers to secure the tool.
- Place the retainer cap on top of the retainer, lubricate the long bolt with provided grease and start turning the long bolt clockwise with the help of a wrench (14mm) to apply pressure to the retainer cap and compress the valve spring until the keepers are completely visible and can come out.
- Using the magnetized end of the screw driver remove the keepers.
- To reinstall the valve assembly, place the valve (if removed for some reason), valve seals, valve spring, and retainer; compress the assembly using the same steps as above.
- Place a small amount of the provided grease on the flat tip of the screw driver and place a keeper over it, the grease will hold the keeper in place and allow you to place the keepers easily.
- Once keepers are in place, start turning the bolt counterclockwise to relieve the pressure of the valve spring.
 Loading... Please wait...


